概述:
简单介绍MacOS开发中如何自定义TitleBar
默认样式
默认的样式如下,无论是可选中的范围还是样式都比较有局限性

目标示例样式
期待的样式如下,选中的范围变高,内容更自由和丰富
选中范围变大意味着什么?Mac上可以通过拖拽TitleBar来移动整个Window窗口,范围变大则操作更舒服

思路
- NSWindow上的Titlebar可以被隐藏;
- NSView可以通过重写mouseDownCanMoveWindow来控制长按移动窗口
步骤
- 自定义CustomWindow,继承自NSWindow,然后在Storyboard中将Window的Class改为CustomWindow
-
重新initWithContentRect方法,并隐藏Titlebar,并设置内容铺满整个window(fullSizeContentView)
class CustomWindow: NSWindow { // 个别属性可以在Storyboard里直接设置,这里都用代码写了 override init(contentRect: NSRect, styleMask style: NSWindow.StyleMask, backing backingStoreType: NSWindow.BackingStoreType, defer flag: Bool) { // styleMask 默认是 [.titled, .closable, .miniaturizable, .resizable] super.init(contentRect: contentRect, styleMask:[.titled, .closable, .miniaturizable, .resizable, .fullSizeContentView], backing: backingStoreType, defer: flag) // titlebar透明 titlebarAppearsTransparent = true // 隐藏title titleVisibility = NSWindow.TitleVisibility.hidden // 点击窗口背景支持鼠标拖动窗口 isMovableByWindowBackground = true // 设置透明背景 isOpaque = false backgroundColor = NSColor.clear } } - 自定义一个NSView,设定好高度和位置代替原Titlebar
-
此时拖拽窗口的任何位置都可以移动window,那么就要把rootView的mouseDownCanMoveWindow重写为false,CustomTitleBae的mouseDownCanMoveWindow重写为true
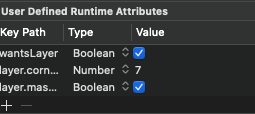
override var mouseDownCanMoveWindow: Bool { return true; // 该属性默认为true } - 最后记得给rootView设置圆角,不然默认是没有圆角的(我这里直接Storyboard里设置了)

wantsLayer = true
layer.cornerRadius = 7.0
layer.masksToBounds = true
最终效果

